


Today is the last session at the Common Core
Café! Its been a great year! Thank you to all who have attended and invested
your time in learning from each other and engaging in meaningful work that will impact all the students in your classroom. I want to especially thank Gladys Garcia and Angie Paz for sharing their content knowledge with us today.
You
can get today’s slides HERE
The websites has over 60 design challenges to get
students planning, building, testing, and iterating their own engineering
projects. The students can engage in a true design process and utilize an
amazing network of supportive experts, all while making real-world connections.
I teach a first and second grade combination class and they have been able to
complete a few of the challenges all on their own. It has been so exciting to
see the students engage in real productive group work in completing the
challenges. The groups were formed based on their ability. I try to group
students in a balanced team where they can build upon each other’s assets.
Teamwork is essential to engineering problem
solving. In their teams, students divide tasks and responsibilities amongst
themselves and rotate roles so that each team member experiences the positions
of leader, team recorder, designer, builder, and materials manager. Students
who work together to solve problems learn that teamwork is a balance of
consensus and leadership. Because each team member undertakes each role at
different times in the project, students discover how to motivate and how to
support.

The biggest key to teaching engineering is
getting students to use an engineering design process. While there are
thousands of variations of the engineering design process, the general format
is defining the problem, identifying criteria and constraints, brainstorm
solutions, choosing an approach, building a prototype, and testing the
solution.


 These are few additional challenges we completed!


ASK
What
is the problem?
What
do you already know?
What
are the limits or
controls of the task?
IMAGINE
What
are some solutions to the problem?
Research
to find out more.
Brainstorm
with your team.
Choose
a way to solve the problem.
PLAN
Draw
a diagram.
What
supplies will you
need?
Who
will do the jobs?
Make
a list of the steps
you will take
CREATE
Follow
your plan.
Collaborate
with your
team.
Work
steadily and
manage your time.
Test
your design.
IMPROVE
Learn
from your mistakes.
Make
your design even better.
Test
it again.
Re-design
again!
PRESENT
Share
your design with the whole group. Be sure you discuss how your errors led to a
better design and what successes you had. Let every team member talk!
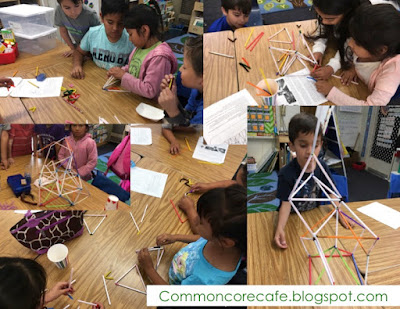
One
of my favorite activities to start the year off is the Spaghetti Tower
Challenge, also known as the Build an Edible Skyscraper. This activity gets my
students working in teams and having the students engage in real productive
work groups.
Materials - Each
group needs:
- 20 unbroken pieces of uncooked, long pasta, such as spaghetti, linguine or fettuccini
- 30 small marshmallows
- Measuring tape or ruler
- Weights or small books
1.
The object of this activity is to build a tower as high AND as strong as you
can using only a limited supply of spaghetti (or linguine or fettuccini) and
marshmallows. There are no step-by-step instructions for this project, only the
constraints of limited resources! Students can do whatever they want with the
materials to try to build a structure as tall, stable and strong as possible.
The project can be made more difficult by adding more constraints such as fewer
materials, a minimum height requirement, or a requirement to support at least a
minimum weight for a given time. Let the student teams' imagination, creativity
and ingenuity run wild.
2.
Hold a competition and give points for how tall the structure is as well as how
much weight it can hold. A good way to comparatively measure the effectiveness
of each structure is by having students take the load the structure can support
and divide it by the weight of the structure. The higher this number, the more
effective the structure. For example, 30g (maximum weight structure could hold)
divided by 10g (weight of structure alone) = 3.
3.
Before testing the structures, have students measure and record the height and
weight of their structure.
4.
How much weight does the structure support? Five grams? 10 grams? 20 grams? 30
grams? Have students record their structure's maximum weight held on the
worksheet, and calculate the load to weight ratio for comparison purposes.
5.
As a class, graph the amount of weight each structure held vs. how much each
structure weighed as well as the height of the structure. Discuss different
trends and use the graph to lead in to the other discussion questions.
6.
After the competition, hold a class discussion:
- Discuss which structure was the tallest and held the most weight.
- Which structures had the highest ratio of load to structure weight?
- Which structures held the most weight, regardless of height, and why.
- Discuss the success or failure of the materials used. Spaghetti cannot hold much tension or compression; therefore, it breaks very easily. Marshmallows handle compression well, but do not hold up to tension (the spaghetti can slip out of them).
- Which geometric shapes seemed the strongest for holding weight - triangles, squares, or circles?
Here is a handout I created to go with this activity:


Join the NEA Professional Practice Communities!
All my resources are posted for FREE in my Ed Communities group. Click on the "common core K-5" link below to take you directly to the site. It's completely free, since it is funded by your NEA dues.
What is this?
The NEA Professional Practice Communities, a place where teachers, parents, school support and administration professionals, and community members share ideas and resources to improve student success. It is free and open to all!


